> ## Documentation Index
> Fetch the complete documentation index at: https://docs.zencoder.ai/llms.txt
> Use this file to discover all available pages before exploring further.
# Projects & Tasks
> Manage repositories, automate configurations, and create/run agent tasks in Zenflow.
## Overview
Zenflow organizes AI-driven work around two core pillars: **Repositories** (codebases configured for automation) and **Tasks** (discrete units of work executed by agents in isolated environments). By configuring repositories with custom automation scripts and managing tasks with structured workflows, you can build a highly optimized, automated software development lifecycle.
***
## Repositories Overview
A repository in Zenflow is the codebase your AI agents work in. Each repository contains tasks, workflows, and automation settings that define how agents interact with your code.
**Organization → Repositories → Tasks → Subtasks/Chats**
Each level inherits settings from above while allowing overrides for specific needs.
### Adding a Repository
Launch the Zenflow desktop app and sign in with your Zencoder account.
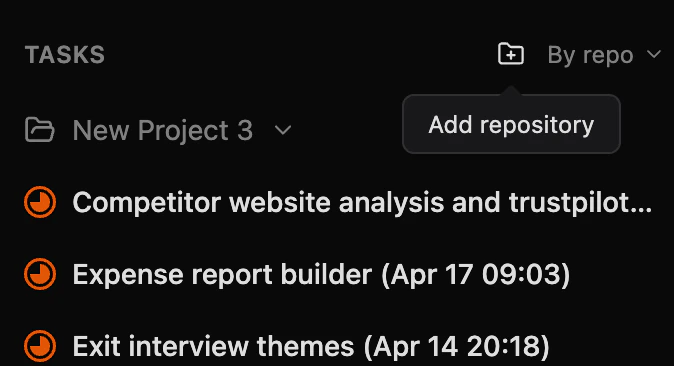
From the sidebar, click the **+** icon and select **Add repository**.
You have three options:
* **Create blank repository** — creates a new empty repository in your local ZenflowProjects folder
* **Clone from GitHub** — clone a repository directly from your GitHub account
* **Select from computer** — browse your local machine for an existing repository
Zenflow also shows **Suggested** repositories based on recently used local folders.
Set up your default agent, verification scripts, and workflow preferences. You can always adjust these later.
Your repository is ready! Create your first task to begin.
### Repository Settings
Access repository settings by selecting your repository in Zenflow. Settings are organized into sections:
#### General
| Setting | Description |
| :---------------------- | :--------------------------------------------- |
| **Repository Name** | The display name for this repository |
| **Git Repository Path** | The absolute path to your local git repository |
#### Scripts & Automation
Scripts run automatically during task execution to set up dependencies, start dev servers, and verify changes. Configuration is stored in `.zenflow/settings.json`.
Use **Set up with Agent** to have an AI agent analyze your repository and generate a suggested configuration automatically.
| Setting | Description |
| :---------------------- | :------------------------------------------------------------------------------------ |
| **Setup Script** | Runs when a new task worktree is created (install dependencies, run migrations, etc.) |
| **Verification Script** | Runs after each agent turn to validate changes (linting, type checks, tests) |
| **Dev Server Script** | Command to start your development server |
| **Copy Files** | Local files (e.g. `.env`) to copy into each task worktree |
#### AI Rules
| Setting | Description |
| :------------------------ | :----------------------------------------------------------------------------------------------------------------- |
| **Always Included Rules** | Rule files (one per line) always added to the agent's context, e.g. `CLAUDE.md`, `.github/copilot-instructions.md` |
***
## Repository Configuration
Zenflow supports repository-level automation through a `.zenflow/settings.json` configuration file that you can add to your repository. This file defines scripts and behaviors that execute at specific points in your task lifecycle, enabling consistent environment setup, automated testing, and verification across all tasks in your repository.
### Getting Started with Repository Configuration
You can set up repository configuration directly from your repository's **Scripts & Automation** settings. Click **Set up with Agent** to have an AI agent analyze your repository structure, dependencies, and development workflow, then generate a suggested `.zenflow/settings.json` for you.
1. Open **Repository Settings** select the repository you want to modify and go to the **Scripts & Automation** section
2. **Click "Set up with Agent"** — Zenflow creates a task where an agent analyzes your repository
3. **Review the suggested configuration** that the agent generates based on your repository
4. **Edit the configuration** to match your specific needs
5. **Merge the changes** directly or create a pull request for team review
This guided approach ensures your repository configuration is tailored to your repository's technology stack and development practices.
### Configuration File Structure
Create a `.zenflow/settings.json` file in the root of your repository with the following structure:
```json theme={"system"}
{
"setup_script": "npm install && npm run build",
"dev_server_script": "npm run dev",
"verification_script": "npm run lint && npm test",
"copy_files": [
".env.local",
"secrets/api-keys.json",
"config/local.config.js"
]
}
```
All fields are optional—configure only what your repository needs.
### Configuration Fields
#### setup\_script
**Executes after each task worktree is created**
The setup script runs automatically when Zenflow creates a new Git worktree for a task. Use this to install dependencies, configure the environment, or prepare the workspace for development.
**Common use cases:**
* Installing project dependencies (`npm install`, `pip install -r requirements.txt`, `bundle install`)
* Building necessary artifacts (`npm run build`, `make setup`)
* Initializing databases or running migrations
* Setting up git hooks or local tools
**Example:**
```json theme={"system"}
{
"setup_script": "pnpm install && pnpm run db:migrate"
}
```
The setup script runs in the root of the newly created worktree with the repository's default shell environment. Long-running setup steps are visible in the task logs.
#### dev\_server\_script
**Defines the command to start your development server**
While not currently executed automatically, this field documents how to run your repository's development server. Future Zenflow versions will use this to automatically start and manage dev servers during task execution.
**Common use cases:**
* Starting local development servers (`npm run dev`, `python manage.py runserver`)
* Running hot-reload watchers
* Launching containerized environments (`docker-compose up`)
**Example:**
```json theme={"system"}
{
"dev_server_script": "npm run dev -- --port 3000"
}
```
Define this field now to future-proof your configuration and document your development workflow for team members.
#### verification\_script
**Runs after each agent turn to validate changes**
The verification script executes automatically after every agent interaction within a task, acting as a continuous quality gate. Use this to run linters, type checkers, tests, or any static analysis tools that should pass before the agent proceeds.
**Common use cases:**
* Running linters (`eslint .`, `ruff check .`, `rubocop`)
* Type checking (`tsc --noEmit`, `mypy .`)
* Running unit tests (`npm test`, `pytest`, `go test ./...`)
* Security scanning (`npm audit`, `safety check`)
* Custom validation scripts
**Example:**
```json theme={"system"}
{
"verification_script": "npm run typecheck && npm run lint && npm test -- --coverage"
}
```
**How verification works:**
1. Agent makes changes to the codebase
2. Verification script runs automatically
3. If the script exits with code 0 (success), the task continues
4. If the script fails (non-zero exit), you'll see the error output and can instruct the agent to fix the issues
**Planned feature**: Future versions will automatically pass verification errors to agents for self-correction. Currently, you review errors and provide guidance to the agent as needed.
Keep verification scripts fast (under 30 seconds when possible) to avoid slowing down agent iterations. Consider running only critical checks in verification and deferring comprehensive test suites to CI/CD.
#### copy\_files
**List of files to copy into each task worktree**
Specify files that should be copied from your local development environment into every task worktree. This is essential for environment-specific configuration, secrets, and local settings that shouldn't be committed to version control.
**Common use cases:**
* Environment files (`.env`, `.env.local`, `.env.development`)
* API keys and secrets (`secrets.json`, `credentials.yaml`)
* Local configuration overrides (`config.local.js`, `settings.local.py`)
* SSL certificates for local development
* Private keys for service authentication
**Example:**
```json theme={"system"}
{
"copy_files": [
".env.local",
"config/database.local.yml",
".secrets/api-keys.json",
"certs/localhost.pem"
]
}
```
**Using glob patterns:**
Glob patterns are supported for matching multiple files at once:
```json theme={"system"}
{
"copy_files": [
".env*",
"config/*.local.json",
".secrets/**/*.key",
"certs/**/*.pem"
]
}
```
**Common glob patterns:**
* `*.env` - All files ending with .env in the root directory
* `.env*` - All files starting with .env (e.g., .env.local, .env.test)
* `config/**/*.json` - All JSON files in config directory and subdirectories
* `secrets/*.{key,pem}` - All .key and .pem files in the secrets directory
**Path resolution:**
* Paths are relative to your repository root
* Files are copied from your main working directory to the same relative path in each task worktree
* Subdirectories in paths are created automatically if they don't exist
* Both explicit file paths and glob patterns are supported
**Security reminder**: The source files must exist in your local repository directory (even if git-ignored). Never commit sensitive files to version control—use `.gitignore` to exclude them while keeping them available for worktree copying.
### Complete Example
Here's a comprehensive configuration for a Node.js web application:
```json theme={"system"}
{
"setup_script": "pnpm install && pnpm run db:migrate && pnpm run build:deps",
"dev_server_script": "pnpm run dev",
"verification_script": "pnpm run typecheck && pnpm run lint && pnpm test:unit -- --run",
"copy_files": [
".env*",
"config/*.local.json",
".secrets/**/*.json"
]
}
```
***
## Tasks Overview
A task is a discrete unit of work that an AI agent executes within an isolated workspace. Tasks can range from quick fixes to full feature implementations, with workflows that adapt to scope and complexity.
Every task runs in its own Git worktree with a dedicated branch, ensuring parallel execution without conflicts.
### Task Modes
Zenflow supports two task modes, selectable via the **Code / Work** toggle at the top of the creation screen:
**"What do you want to build?"** — For coding tasks in git repositories. Tasks run in an isolated worktree with a dedicated branch.
**"What do you want to get done?"** — For non-code tasks like brainstorming, research, and writing. No repository required — tasks use a local folder.
#### Code Workflows
| Workflow | Description |
| :-------------------------------------------------------------- | :---------------------------------------------------- |
| [**Auto**](/zenflow/workflows/auto) | Agent decides the approach based on your prompt |
| [**Fix a Bug**](/zenflow/workflows/fix-a-bug) | Investigation → Solution → Implementation |
| [**Spec First**](/zenflow/workflows/spec-first) | Technical spec before coding |
| [**Requirements First**](/zenflow/workflows/requirements-first) | Full PRD → spec → staged implementation |
| [**Multi-model**](/zenflow/workflows/multi-model) | Different models for planning, implementation, review |
| [**Custom**](/zenflow/workflows/custom) | Your own workflow definitions |
#### Work Workflows
| Workflow | Description |
| :------------------ | :--------------------------------------- |
| **Auto** | Agent decides the approach |
| **Brainstorm** | Ideation and exploration |
| **Deep Brainstorm** | Extended multi-step brainstorming (beta) |
| **Research** | Web research and analysis |
| **Write** | Content creation and writing |
### Creating a Task
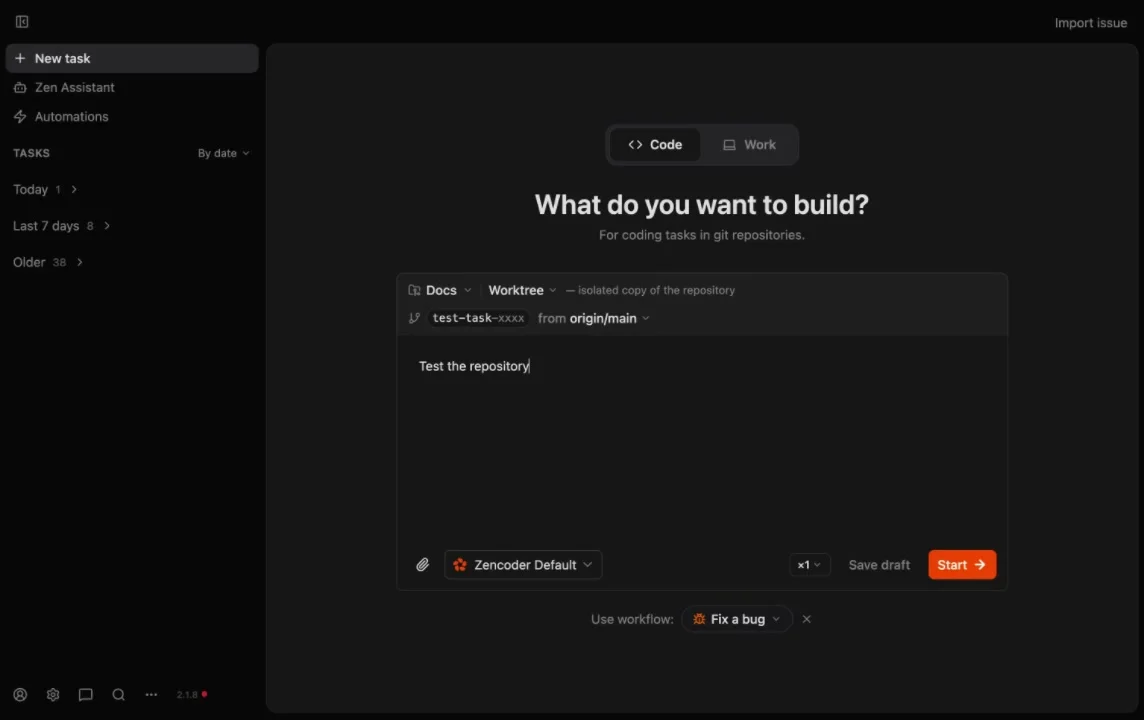 Choose **Code** for repository-based work or **Work** for non-code tasks.
In Code mode, select the repository and source branch. In Work mode, select a local folder. Each Code task creates an isolated worktree at `.zenflow/worktrees/{task_id}`.
Write a clear description. Use `@` to reference files or attach images for context.
Select from the workflow buttons below the input area, or let the agent use **Auto** by default.
Click the preset dropdown (defaults to **Zencoder Default**) to choose a different agent configuration, or create a new preset.
Click **Start** to spin up the agent immediately, or **Save draft** to run later.
You can also import tasks directly from external tools using the **Import issue** button in the top-right corner.
### Task View
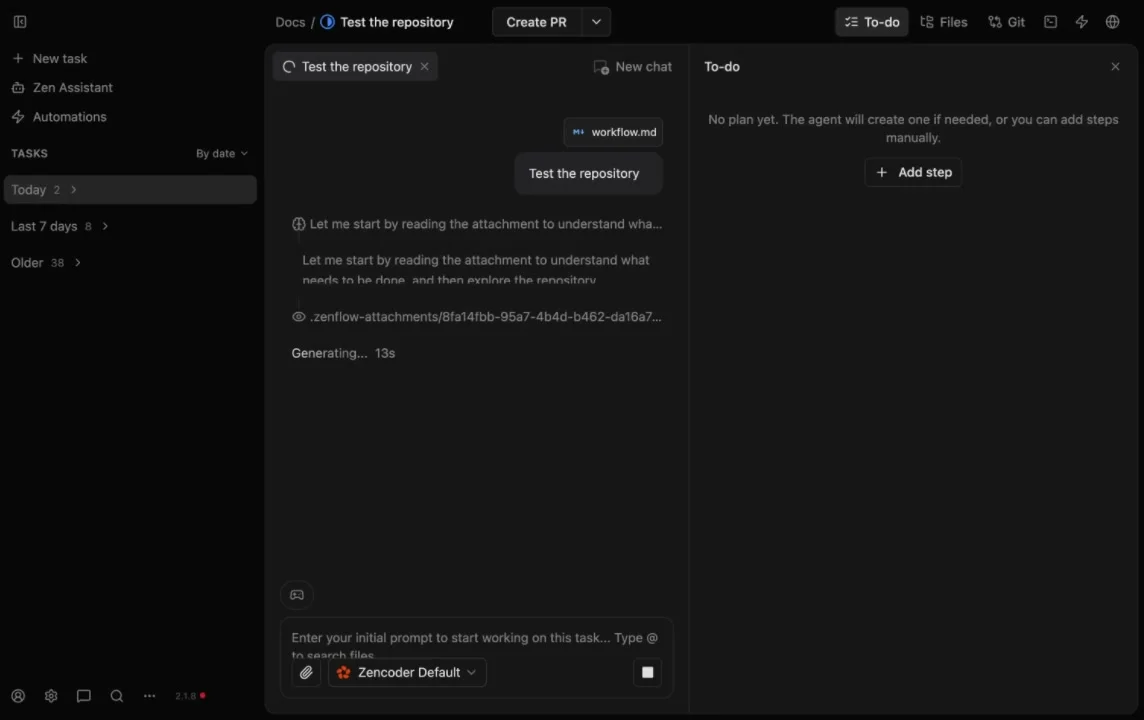
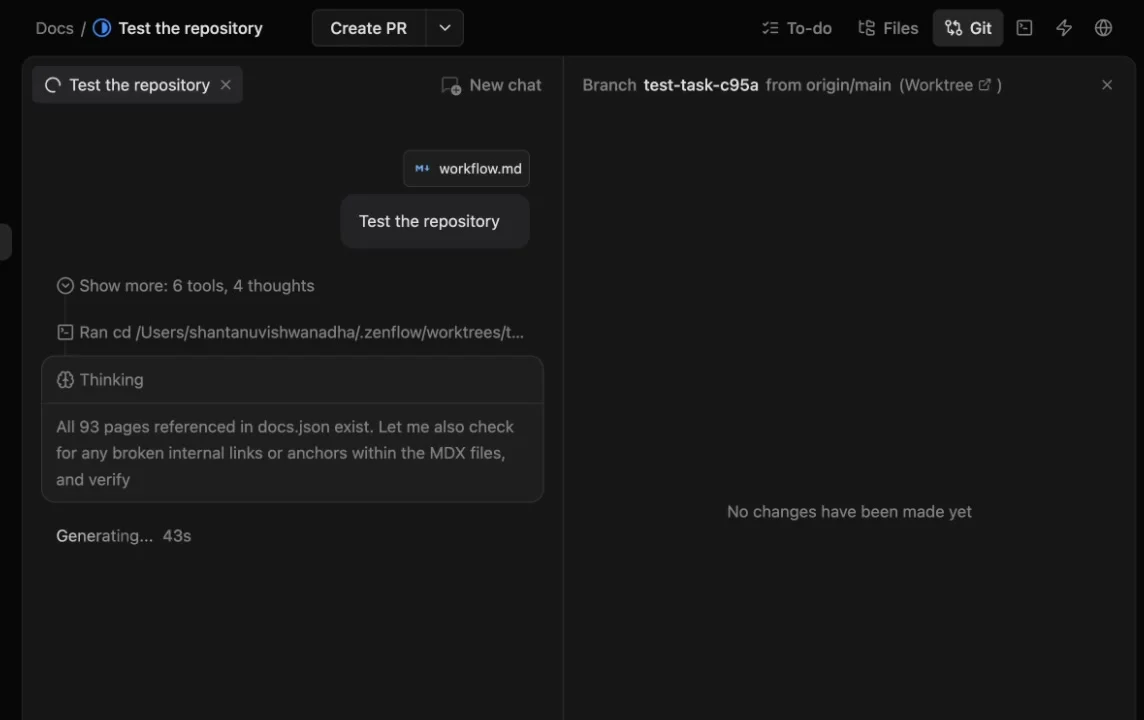
Once a task is running, the interface splits into a multi-panel layout:
#### Top Bar
The top bar shows the repository name, task name, and key actions:
| Element | Description |
| :---------------- | :---------------------------------------------------------------------------------------------- |
| **To-do** | View and manage workflow steps. Add steps manually or let the agent generate them. |
| **Files** | Browse and search all files in the task worktree. **Task files** view shows workflow artifacts. |
| **Git** | See the task branch, base branch, diffs, and committed file changes. |
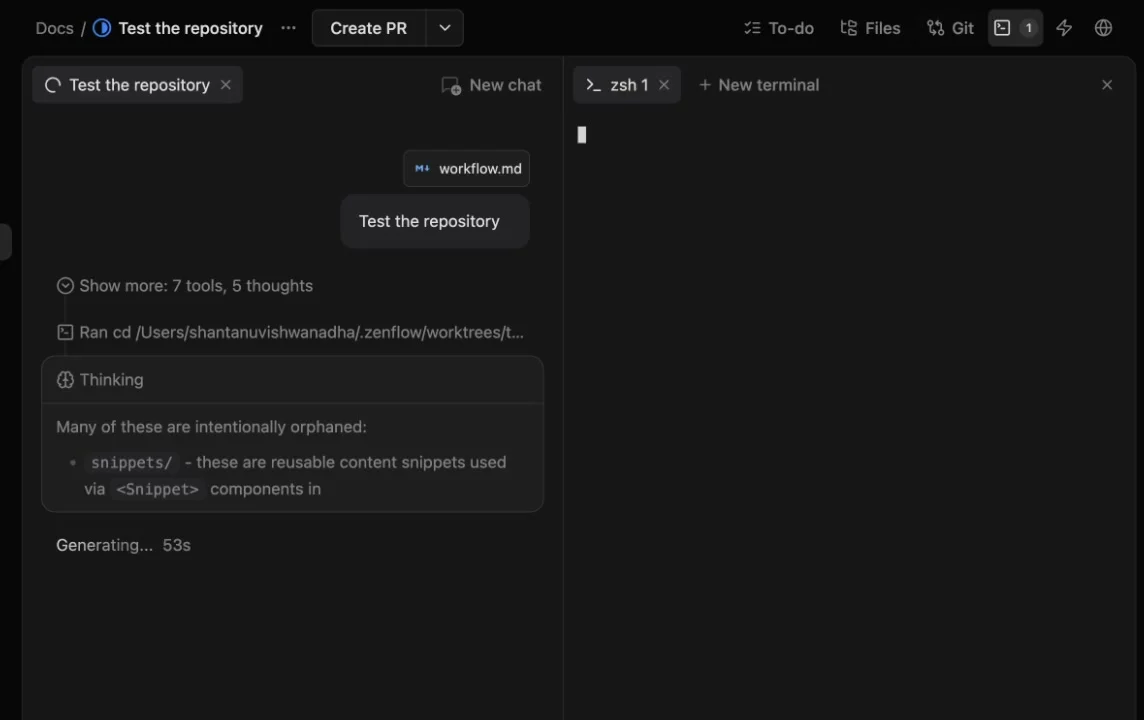
| **Terminal** | Open terminal sessions inside the task's worktree. Multiple tabs supported. |
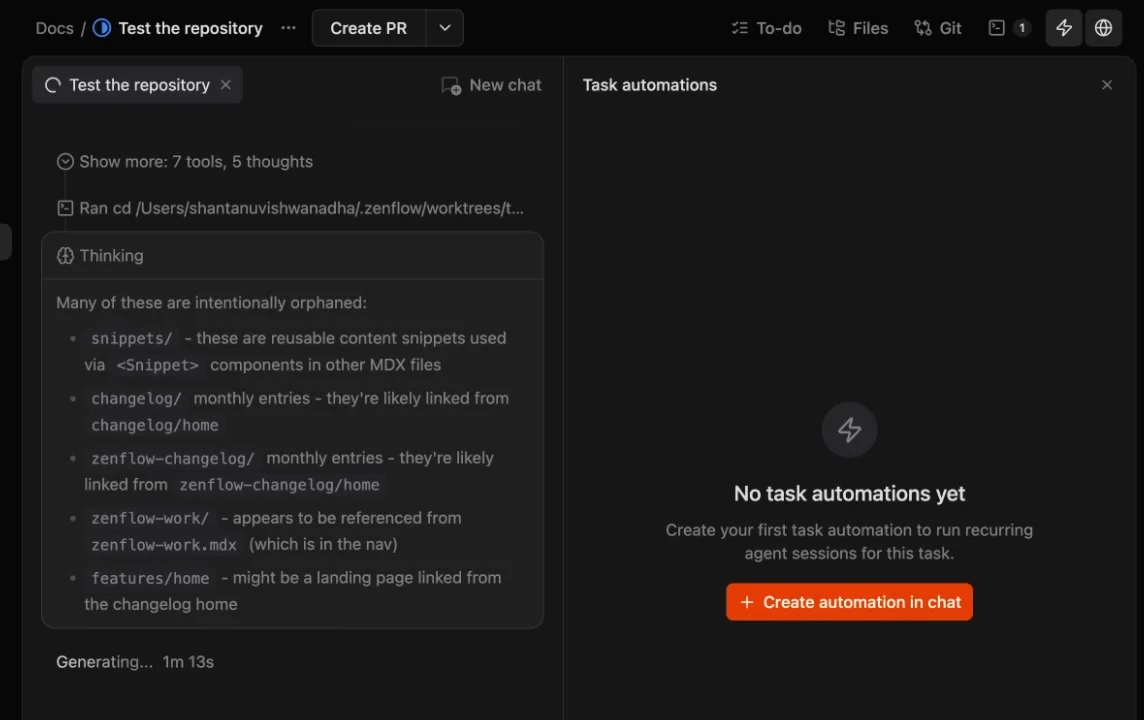
| **Automations** | Create and manage recurring agent sessions for this task. |
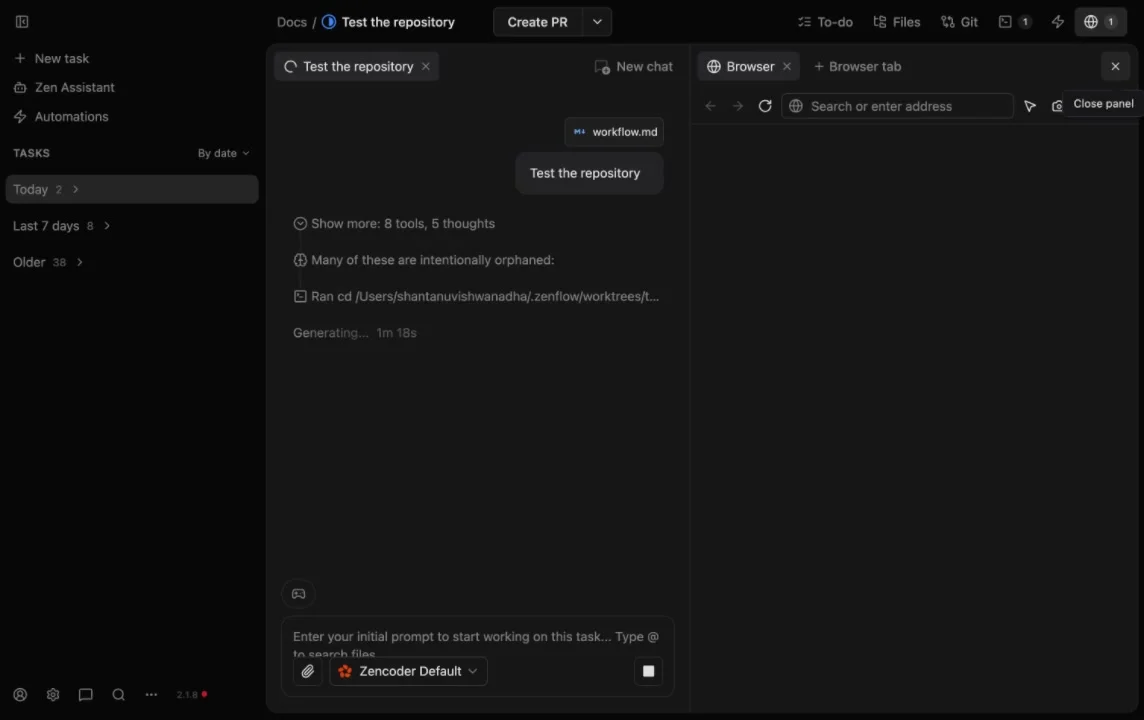
| **Browser** | Built-in browser for previewing web apps or browsing documentation. |
| **Task menu (⋯)** | Edit, Open in IDE, Reveal in Finder, Duplicate, Archive, Delete. |
#### Chat Panel (Left)
The left side contains the agent conversation:
* **Chat tabs** — Each workflow step or subtask gets its own tab. Click **New chat** to open additional conversations for follow-ups or guidance.
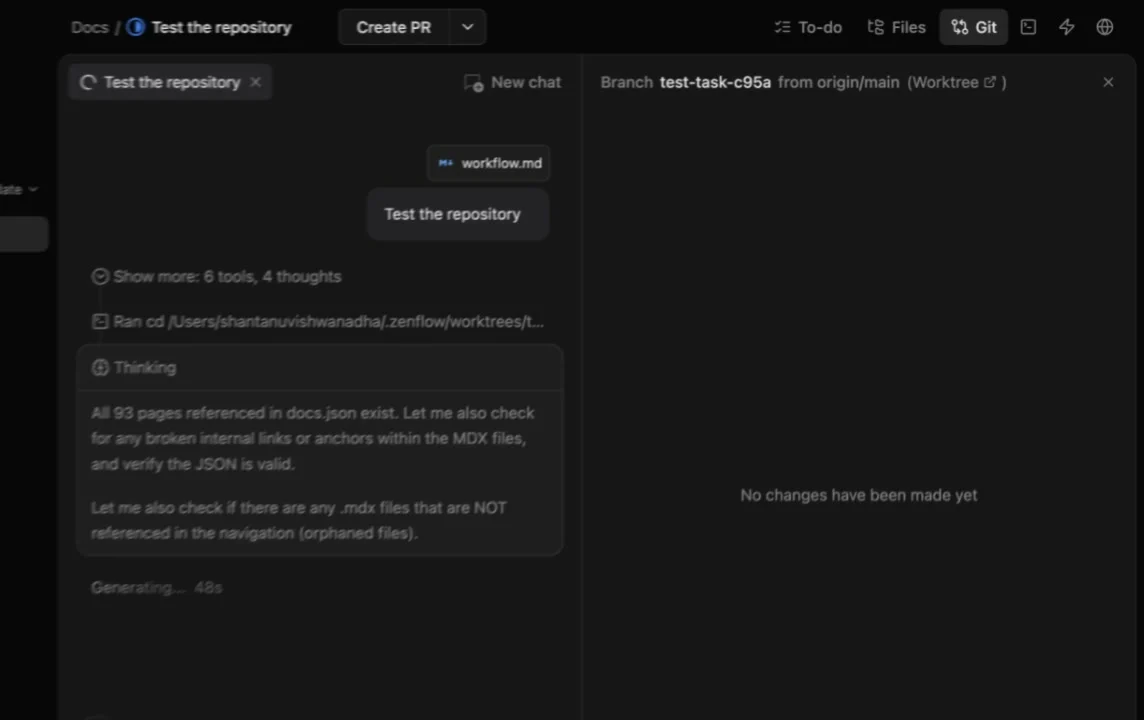
* **Live telemetry** — Streams tool calls, shell commands, file reads, and thinking so you can watch what the agent is doing.
* **Interactive composer** — Type follow-up prompts, use `@` to reference files, attach images, and switch agent presets mid-task.
#### Context Panel (Right)
The right side changes based on which top bar tab is active. Here are the **Git**, **Terminal**, **Browser**, and **Automations** panels:
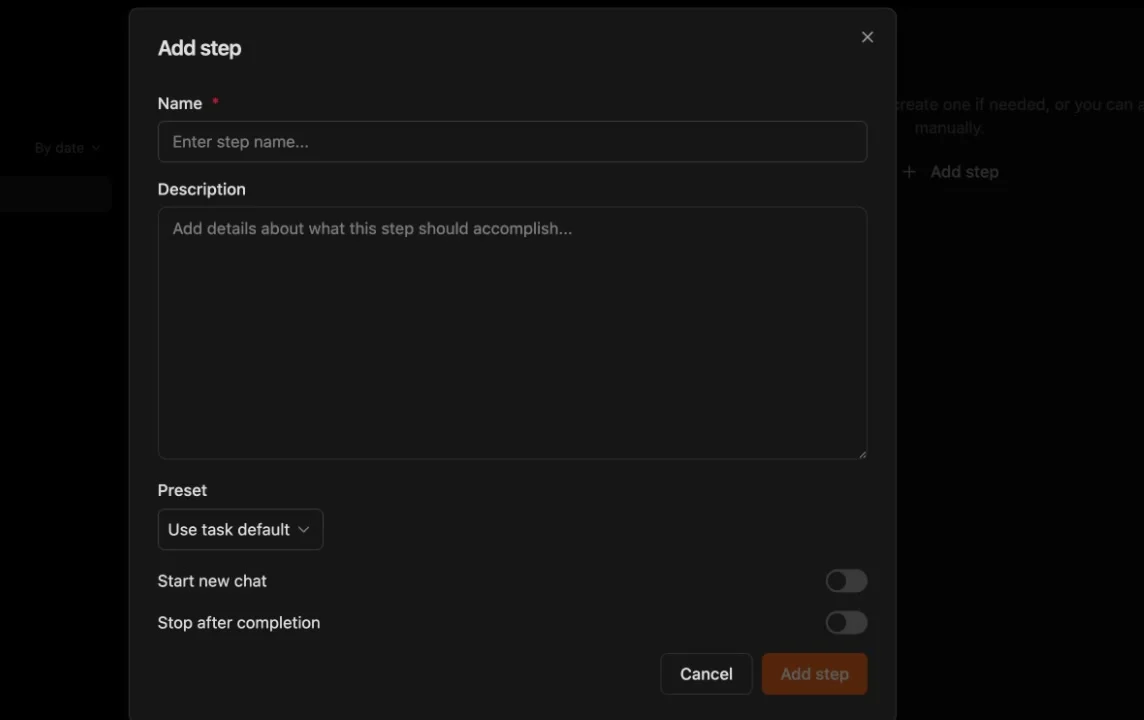
* **To-do** — Shows workflow steps from the plan. Use **+ Add step** to create custom steps with a name, description, preset override, and toggles for "Start new chat" and "Stop after completion."
* **Files** — File explorer with search and a **Task files** section for quick access to artifacts like `workflow.md` and `plan.md`.
* **Git** — Branch name, base branch, and file-level diffs for all committed changes.
* **Terminal** — One or more terminal sessions rooted in the task worktree.
* **Automations** — In-task automation manager. Create recurring agent sessions that run on a schedule.
* **Browser** — Embedded Chromium browser with address bar, navigation, and dev tools.
### Task States
Tasks move through these states as work progresses:
| State | Icon | Description |
| :-------------- | :-------------- | :--------------------------------- |
| **To Do** | Dashed circle | Task created but not yet started |
| **In Progress** | Blue circle | Agent actively working on the task |
| **In Review** | Orange circle | Changes ready for human review |
| **Done** | Green checkmark | Work completed successfully |
| **Cancelled** | Gray X | Task was stopped or abandoned |
### Adding Steps
You can add steps to a task's plan manually at any time:
1. Open the **To-do** panel from the top bar
2. Click **+ Add step**
3. Fill in the step details:
| Field | Description |
| :------------------------ | :-------------------------------------------------------------------------------- |
| **Name** | Short label for the step (required) |
| **Description** | Detailed instructions for what the step should accomplish |
| **Preset** | Agent preset override — defaults to "Use task default" |
| **Start new chat** | Toggle to open a fresh chat context for this step |
| **Stop after completion** | Toggle to pause the task after this step finishes (useful for review checkpoints) |
If you don't add steps manually, the agent will create a plan automatically based on the workflow type and your task description.
### Task Actions
#### Create PR
Push the task branch and open a pull request on GitHub. The dropdown offers additional options for merge strategies.
#### Open in IDE
Launch your editor directly in the task's worktree directory so you can make manual edits alongside the agent.
#### Duplicate
Create a copy of the task with the same description and configuration. Useful for running variations of the same work.
#### Archive
Remove the task from the active view and clean up the worktree. Archived tasks can still be referenced but no longer consume disk space.
#### Delete
Permanently remove the task, its worktree, and all associated data.
### Parallel Execution
Zenflow supports running multiple tasks simultaneously:
* Each task has its own worktree and branch
* Agents don't interfere with each other
* You can start new tasks while others are in progress
* Disk space scales with active task count
Each worktree is a full copy of working files. Archive completed tasks regularly to free disk space.
### Task Artifacts
Depending on the workflow, tasks generate artifacts in the task worktree:
| Artifact | Workflow |
| :----------------- | :--------------------------------------------- |
| `workflow.md` | All workflows — defines the workflow structure |
| `plan.md` | All workflows — execution steps and progress |
| `spec.md` | Spec First, Requirements First |
| `requirements.md` | Requirements First |
| `investigation.md` | Fix a Bug |
| `solution.md` | Fix a Bug |
***
## Best Practices & Troubleshooting
### Best Practices
Design setup scripts to be safely re-runnable. Avoid commands that fail if run multiple times, or add conditional checks to skip steps that are already complete.
**Example:** Check if dependencies are already installed before running a slow installation step.
Balance thoroughness with speed. Include critical checks (linting, type checking, fast unit tests) in verification, but save comprehensive integration tests and end-to-end tests for CI/CD after PR creation.
Create a `.env.example` or `README` section that lists all required environment variables. This helps team members understand what files need to be present for `copy_files` to work correctly.
Commit `.zenflow/settings.json` to version control so the entire team shares the same automation setup. This creates a single source of truth for repository workflow configuration.
Ensure your verification script exits with code 0 only when all checks pass. Most test runners and linters already follow this convention, but custom scripts should explicitly `exit 1` on failure.
### Troubleshooting
**Check the task logs** to see the exact error output. Common issues:
* Missing dependencies on the system (Node.js, Python, package managers)
* Incorrect paths in the script (remember it runs from the worktree root)
* Network issues preventing dependency downloads
* Insufficient permissions for file operations
**Solution:** Test the setup script manually in a fresh clone of your repository to reproduce the issue.
If your verification script consistently fails even when code looks correct:
* Ensure the script runs successfully in your main development directory first
* Check that all required files are being copied via `copy_files` (e.g., `.env` files)
* Verify that the setup script completed successfully before verification runs
* Confirm that your verification commands are compatible with CI-style execution (no interactive prompts)
**Tip:** Add `echo` statements to your verification script to debug which specific command is failing.
If files specified in `copy_files` aren't being copied:
* Confirm the files exist in your main repository directory (check the exact paths)
* Verify paths are relative to the repository root, not absolute paths
* Check file permissions—Zenflow needs read access to the source files
* Look for typos in file paths (paths are case-sensitive on Unix systems)
**Note:** Files are copied when the worktree is created, not continuously synced. Changes to source files require recreating the task worktree.
Zenflow looks for `.zenflow/settings.json` in the repository root. Ensure:
* The file path is exactly `.zenflow/settings.json` (note the leading dot)
* The JSON is valid (use a JSON validator or `jq` to check)
* The file is committed and present in the branch being used for task creation
* You've restarted Zenflow or refreshed the repository after adding the configuration
Choose **Code** for repository-based work or **Work** for non-code tasks.
In Code mode, select the repository and source branch. In Work mode, select a local folder. Each Code task creates an isolated worktree at `.zenflow/worktrees/{task_id}`.
Write a clear description. Use `@` to reference files or attach images for context.
Select from the workflow buttons below the input area, or let the agent use **Auto** by default.
Click the preset dropdown (defaults to **Zencoder Default**) to choose a different agent configuration, or create a new preset.
Click **Start** to spin up the agent immediately, or **Save draft** to run later.
You can also import tasks directly from external tools using the **Import issue** button in the top-right corner.
### Task View
Once a task is running, the interface splits into a multi-panel layout:
#### Top Bar
The top bar shows the repository name, task name, and key actions:
| Element | Description |
| :---------------- | :---------------------------------------------------------------------------------------------- |
| **To-do** | View and manage workflow steps. Add steps manually or let the agent generate them. |
| **Files** | Browse and search all files in the task worktree. **Task files** view shows workflow artifacts. |
| **Git** | See the task branch, base branch, diffs, and committed file changes. |
| **Terminal** | Open terminal sessions inside the task's worktree. Multiple tabs supported. |
| **Automations** | Create and manage recurring agent sessions for this task. |
| **Browser** | Built-in browser for previewing web apps or browsing documentation. |
| **Task menu (⋯)** | Edit, Open in IDE, Reveal in Finder, Duplicate, Archive, Delete. |
#### Chat Panel (Left)
The left side contains the agent conversation:
* **Chat tabs** — Each workflow step or subtask gets its own tab. Click **New chat** to open additional conversations for follow-ups or guidance.
* **Live telemetry** — Streams tool calls, shell commands, file reads, and thinking so you can watch what the agent is doing.
* **Interactive composer** — Type follow-up prompts, use `@` to reference files, attach images, and switch agent presets mid-task.
#### Context Panel (Right)
The right side changes based on which top bar tab is active. Here are the **Git**, **Terminal**, **Browser**, and **Automations** panels:
* **To-do** — Shows workflow steps from the plan. Use **+ Add step** to create custom steps with a name, description, preset override, and toggles for "Start new chat" and "Stop after completion."
* **Files** — File explorer with search and a **Task files** section for quick access to artifacts like `workflow.md` and `plan.md`.
* **Git** — Branch name, base branch, and file-level diffs for all committed changes.
* **Terminal** — One or more terminal sessions rooted in the task worktree.
* **Automations** — In-task automation manager. Create recurring agent sessions that run on a schedule.
* **Browser** — Embedded Chromium browser with address bar, navigation, and dev tools.
### Task States
Tasks move through these states as work progresses:
| State | Icon | Description |
| :-------------- | :-------------- | :--------------------------------- |
| **To Do** | Dashed circle | Task created but not yet started |
| **In Progress** | Blue circle | Agent actively working on the task |
| **In Review** | Orange circle | Changes ready for human review |
| **Done** | Green checkmark | Work completed successfully |
| **Cancelled** | Gray X | Task was stopped or abandoned |
### Adding Steps
You can add steps to a task's plan manually at any time:
1. Open the **To-do** panel from the top bar
2. Click **+ Add step**
3. Fill in the step details:
| Field | Description |
| :------------------------ | :-------------------------------------------------------------------------------- |
| **Name** | Short label for the step (required) |
| **Description** | Detailed instructions for what the step should accomplish |
| **Preset** | Agent preset override — defaults to "Use task default" |
| **Start new chat** | Toggle to open a fresh chat context for this step |
| **Stop after completion** | Toggle to pause the task after this step finishes (useful for review checkpoints) |
If you don't add steps manually, the agent will create a plan automatically based on the workflow type and your task description.
### Task Actions
#### Create PR
Push the task branch and open a pull request on GitHub. The dropdown offers additional options for merge strategies.
#### Open in IDE
Launch your editor directly in the task's worktree directory so you can make manual edits alongside the agent.
#### Duplicate
Create a copy of the task with the same description and configuration. Useful for running variations of the same work.
#### Archive
Remove the task from the active view and clean up the worktree. Archived tasks can still be referenced but no longer consume disk space.
#### Delete
Permanently remove the task, its worktree, and all associated data.
### Parallel Execution
Zenflow supports running multiple tasks simultaneously:
* Each task has its own worktree and branch
* Agents don't interfere with each other
* You can start new tasks while others are in progress
* Disk space scales with active task count
Each worktree is a full copy of working files. Archive completed tasks regularly to free disk space.
### Task Artifacts
Depending on the workflow, tasks generate artifacts in the task worktree:
| Artifact | Workflow |
| :----------------- | :--------------------------------------------- |
| `workflow.md` | All workflows — defines the workflow structure |
| `plan.md` | All workflows — execution steps and progress |
| `spec.md` | Spec First, Requirements First |
| `requirements.md` | Requirements First |
| `investigation.md` | Fix a Bug |
| `solution.md` | Fix a Bug |
***
## Best Practices & Troubleshooting
### Best Practices
Design setup scripts to be safely re-runnable. Avoid commands that fail if run multiple times, or add conditional checks to skip steps that are already complete.
**Example:** Check if dependencies are already installed before running a slow installation step.
Balance thoroughness with speed. Include critical checks (linting, type checking, fast unit tests) in verification, but save comprehensive integration tests and end-to-end tests for CI/CD after PR creation.
Create a `.env.example` or `README` section that lists all required environment variables. This helps team members understand what files need to be present for `copy_files` to work correctly.
Commit `.zenflow/settings.json` to version control so the entire team shares the same automation setup. This creates a single source of truth for repository workflow configuration.
Ensure your verification script exits with code 0 only when all checks pass. Most test runners and linters already follow this convention, but custom scripts should explicitly `exit 1` on failure.
### Troubleshooting
**Check the task logs** to see the exact error output. Common issues:
* Missing dependencies on the system (Node.js, Python, package managers)
* Incorrect paths in the script (remember it runs from the worktree root)
* Network issues preventing dependency downloads
* Insufficient permissions for file operations
**Solution:** Test the setup script manually in a fresh clone of your repository to reproduce the issue.
If your verification script consistently fails even when code looks correct:
* Ensure the script runs successfully in your main development directory first
* Check that all required files are being copied via `copy_files` (e.g., `.env` files)
* Verify that the setup script completed successfully before verification runs
* Confirm that your verification commands are compatible with CI-style execution (no interactive prompts)
**Tip:** Add `echo` statements to your verification script to debug which specific command is failing.
If files specified in `copy_files` aren't being copied:
* Confirm the files exist in your main repository directory (check the exact paths)
* Verify paths are relative to the repository root, not absolute paths
* Check file permissions—Zenflow needs read access to the source files
* Look for typos in file paths (paths are case-sensitive on Unix systems)
**Note:** Files are copied when the worktree is created, not continuously synced. Changes to source files require recreating the task worktree.
Zenflow looks for `.zenflow/settings.json` in the repository root. Ensure:
* The file path is exactly `.zenflow/settings.json` (note the leading dot)
* The JSON is valid (use a JSON validator or `jq` to check)
* The file is committed and present in the branch being used for task creation
* You've restarted Zenflow or refreshed the repository after adding the configuration